Detecting Suspicious Office 365 Emails with Wazuh
Overview
| Operating System | Ubuntu 24.04.3 LTS |
| Tools | Microsoft Defender for Office 365, Python, Wazuh Stack |
In this scenario, I demonstrate my approach for alerting on suspicious emails received in the Office 365 email ecosystem using Wazuh. The alerting logic is based on SPF/DKIM/DMARC DNS records configured on the sender’s domain. These records are critical for validating sender authenticity. To better understand this, here is a short summary of each:
| Mechanism | What it does | How it works (technical) |
|---|---|---|
| SPF | Verifies that the sending mail server is authorized for the sender’s domain. | The receiving server checks the domain’s SPF DNS TXT record and compares the sending IP address against the allowed IP list. |
| DKIM | Confirms message integrity and the sender domain’s authenticity. | The sending server signs the email with a private key, and the receiver validates the signature using the public key published in DNS. |
| DMARC | Enforces authentication policy and provides reporting based on SPF and DKIM results. | The receiving server evaluates SPF/DKIM alignment against the DMARC DNS policy and applies the configured action (none/quarantine/reject). |
To implement this, I use Microsoft Defender for Office 365 email reports retrieved via the Microsoft Defender XDR API. A common question is why we perform alerting in Wazuh when the data already exists in Defender. In environments where the SIEM capability is centralized in Wazuh, correlating and alerting on this data within the same platform is often the most practical and operationally consistent approach.
Get Information from Defender
1. Register App to Request the API
First, register a new application in the Microsoft cloud environment that will query the Defender API. The navigation path is:
Azure Portal → Azure Active Directory (Microsoft Entra ID) → Manage → App registrations → New
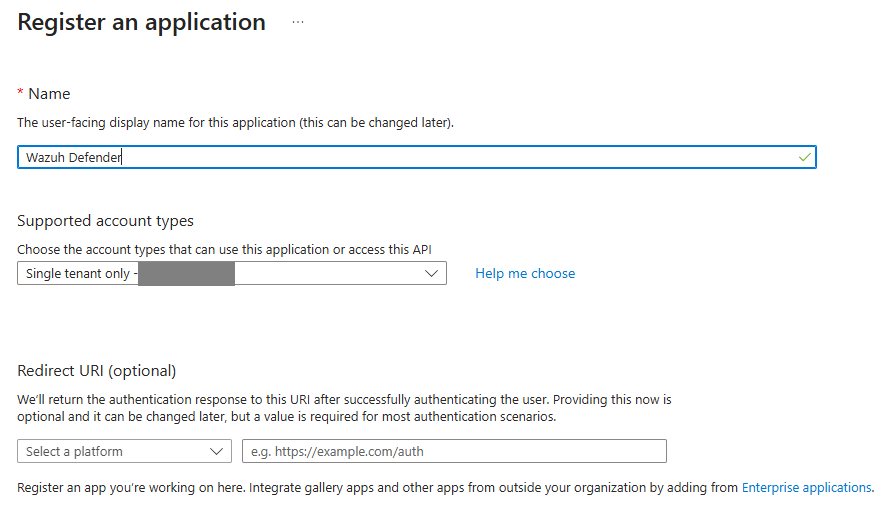
Do not forget to create a client secret after the app registration is complete (it will be needed later):

Important: Save this secret, because once you close the window, it will not be visible later.
Finally, grant the registered app permission (AdvancedHunting.Read.All) to read Defender data under the “API permissions” menu:
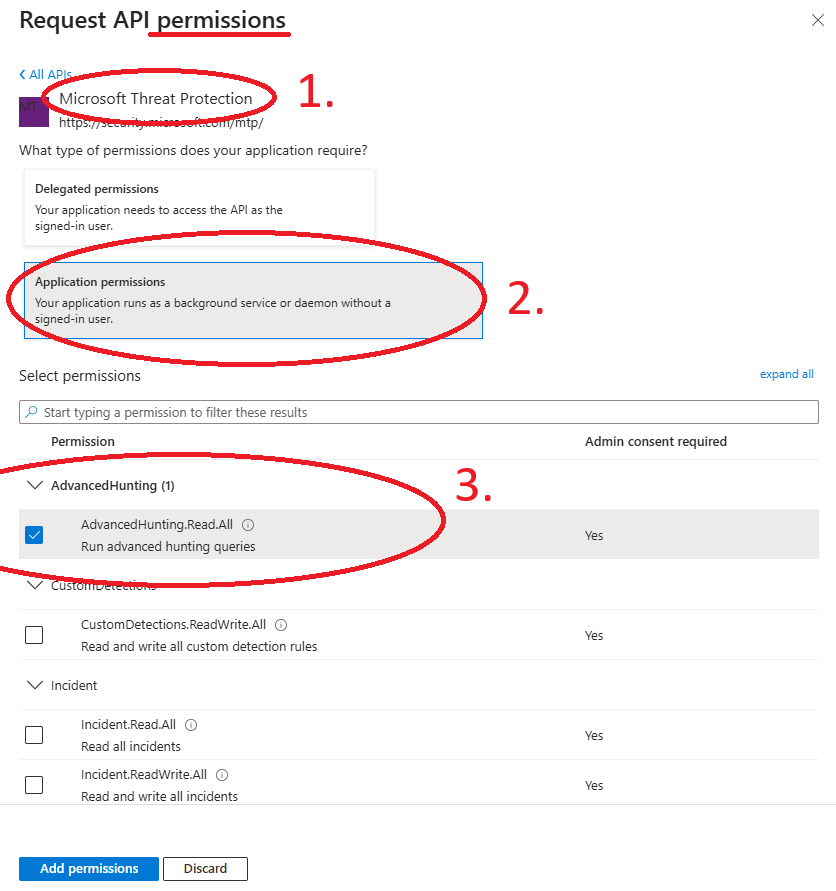
After this step click “Grant admin consent for your name“ to apply the permission.
2. Python Script for Data Collection
The next step is to create the collector application that communicates with the Microsoft Defender XDR API and produces JSON output for Wazuh parsing.
The simplest implementation is a Python script like the following:
sudo mkdir /opt/collectors
sudo vi /opt/collectors/defender_email_auth.py
#!/usr/bin/python3
import requests
import json
import datetime
TENANT_ID = "TENANT_ID"
CLIENT_ID = "CLIENT_ID"
CLIENT_SECRET = "SECRET"
AUTH_URL = f"https://login.microsoftonline.com/{TENANT_ID}/oauth2/v2.0/token"
HUNT_URL = "https://api.security.microsoft.com/api/advancedhunting/run"
# ---- TOKEN ----
data = {
"client_id": CLIENT_ID,
"client_secret": CLIENT_SECRET,
"scope": "https://api.security.microsoft.com/.default",
"grant_type": "client_credentials"
}
token = requests.post(AUTH_URL, data=data).json()["access_token"]
# ---- QUERY ----
query = {
"Query": """
EmailEvents
| where Timestamp > ago(2h)
| extend Auth = parse_json(AuthenticationDetails)
| project Timestamp,
NetworkMessageId,
SenderFromDomain,
RecipientEmailAddress,
SPFVerdict = tostring(Auth.SPF),
DKIMVerdict = tostring(Auth.DKIM),
DMARCVerdict = tostring(Auth.DMARC),
CompAuthVerdict = tostring(Auth.CompAuth),
DeliveryAction,
LatestDeliveryAction
"""
}
headers = {
"Authorization": f"Bearer {token}",
"Content-Type": "application/json"
}
r = requests.post(HUNT_URL, headers=headers, json=query)
results = r.json().get("Results", [])
# ---- FILE WAZUH-NAK ----
with open("/var/log/wazuh/defender_email_auth.json", "a") as f:
for e in results:
f.write(json.dumps(e) + "\n")You must replace the TENANT_ID, CLIENT_ID and CLIENT_SECRET variables in the script with your app registration values.
You can see the Advanced Hunting query embedded in the script. For best results, review your tenant’s EmailEvents table schema and tailor the query if needed, or use this example as-is.
3. Make Executable, Test, and Schedule
Make the script executable, prepare the JSON log file, and run the script for testing.
sudo chmod +x /opt/collectors/defender_email_auth.py
sudo mkdir /var/log/wazuh
sudo touch /var/log/wazuh/defender_email_auth.json
sudo /opt/collectors/defender_email_auth.py
If everything works correctly, structured JSON entries should appear in the log file:
sudo cat /var/log/wazuh/defender_email_auth.jsonSchedule the script to run every 15 minutes (or as required) via crontab:
*/15 * * * * python3 /opt/collectors/defender_email_auth.pyNote: The log file will be appended with new email data every 15 minutes. For production use, configuring logrotate is recommended for performance and disk management.
Processing with Wazuh
Next, configure the Wazuh manager to ingest the JSON log.
Add the following block to /var/ossec/etc/ossec.conf:
<localfile>
  <log_format>json</log_format>
  <location>/var/log/wazuh/defender_email_auth.json</location>
</localfile>
At this point, the email telemetry is ingested and ready for detection logic. Based on the table below, we create alerting rules for suspicious authentication states. This list is not exhaustive and can be extended with additional SPF/DKIM/DMARC verdict combinations.
| Condition | Description |
|---|---|
| SPFVerdict=fail | SPF failure |
| DKIMVerdict=fail | DKIM failure |
| DMARCVerdict=fail | DMARC failure |
| SPFVerdict=softfail | SPF softfail |
To implement the trigger conditions, create a custom rule file in the Wazuh manager rules directory:
sudo vi /var/ossec/etc/rules/m365_defender_rules.xml<group name="email,defender,">
<rule id="100200" level="10">
<field name="DMARCVerdict">^[Ff]ail$</field>
<description>Email authentication failure - DMARC fail</description>
</rule>
<rule id="100201" level="7">
<field name="SPFVerdict">^[Ff]ail$</field>
<description>Email authentication issue - SPF fail</description>
</rule>
<rule id="100202" level="7">
<field name="DKIMVerdict">^[Ff]ail$</field>
<description>Email authentication issue - DKIM fail</description>
</rule>
<rule id="100203" level="5">
<field name="SPFVerdict">^[Ss]oft[Ff]ail$</field>
<description>Email authentication warning - SPF softfail</description>
</rule>
</group>Apply the changes by restarting the manager:
sudo systemctl restart wazuh-managerTesting
If the pipeline is working correctly, alerts will appear when suspicious emails are received.
Using the rule group name, search in Wazuh → Discovery, for example:
rule.groups:"defender"Initially, you may not see any results. To generate test alerts, send emails with intentionally misconfigured or spoofed DNS authentication. The following screenshot shows a possible rule output (soon).
In this scenario, I used my own test domain and modified the DKIM record to trigger suspicious activity.